-
Learning Deep Features for Discriminative Localization머신러닝, 딥러닝 공부 2020. 2. 2. 19:48반응형
Introduction
대부분의 CNN 구성에서 처음에는 convoluton layer와 pooling을 쌓고, 어느 정도 특징을 추출할 수 있을 정도로 깊어지면 fully-connected layer를 사용해서 최종적으로 어떤 class에 속하게 될지 확률을 뽑아내게 된다. 일반적으로 convolution을 feature의 위치 정보를 활용할 수 있지만, fully-connected layer에 의해 결국 일렬로 늘어뜨려야 하고(flatten) 결국 이러한 정보를 사용하지 못하게 된다.
Network in Network 논문에서는 FC를 사용하는 대신 Global Average Pooling(GAP)를 사용한다. GAP에서는 마지막 convolution layer가 우리가 분류해야 되는 Class의 수만큼 채널을 갖는다. 예를 들어 10개의 class를 분류해야 하는 문제라면 총 10개의 channel을 가진다. 이렇게 얻은 10개의 channel에서 각 채널을 기준으로 평균을 구한다. 이 각각의 값들이 class에 대응하는 값들이 되는 것이고, 가장 큰 값을 가지는 부분으로 예측을 하게 된다.

논문에서는 GAP가 regularizer의 역할을 수행한다고 하지만 이런 방식으로 CNN을 구현하게 되면 마지막 FC를 사용하지 않게 되므로 위치 정보를 그대로 사용한다고 해석할 수 있다.
Class Activation Mapping
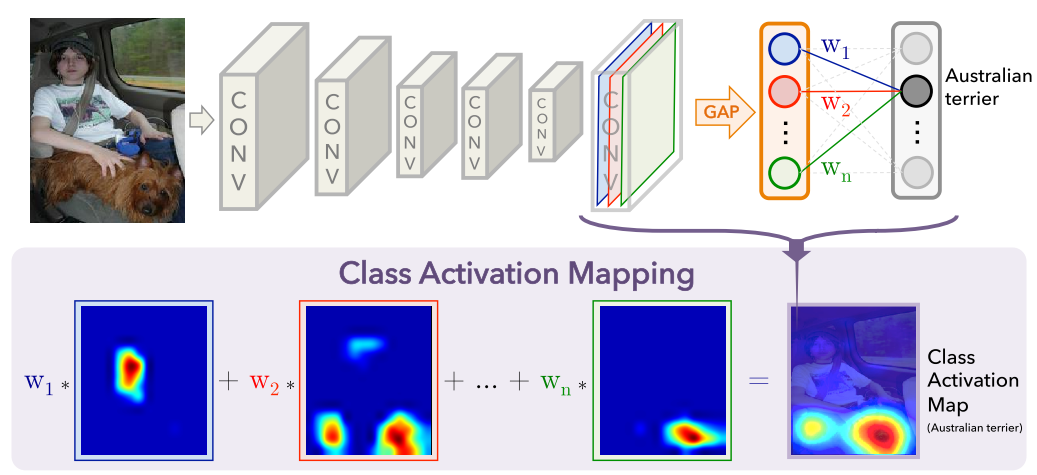
convolution layer를 거치고 n개의 feature map을 얻었다고 하자. 이제 feature map에서 GAP를 수행하고 출력된 값을 softmax에 넣어 확률 값으로 바꾼다. 이 과정을 수식으로 표현해보자.
먼저 각각의 feature map 중 (위 그림에서의 BRG색으로 표현된 3개 층) k번째 feature map을 f_k, 각 feature map에서 (x, y)에 위치한 값을 f_k(x, y)라고 하자. 이제 GAP 과정을 거치면 등장하는 값(위 그림에서 BRG의 큰 노드)을 F_k라 하면 다음과 같은 수식이 성립한다.

또한 class c에 대해서 각 softmax 입력에 들어가는 값은

가 될 것이다. 이 식을 좀 더 정리하면

이다. 이때

라고 하면 M_c가 바로 class c의 class activation map(CAM)이 되고 이는 (x, y)에 위치한 값이 c라는 class로 분류되는데 미치는 중요도를 나타내게 되는 것이다. 이를 그림으로 표현한 것이 위의 그림이다.
추가로 아래 그림을 보면 이해하기 편하다.
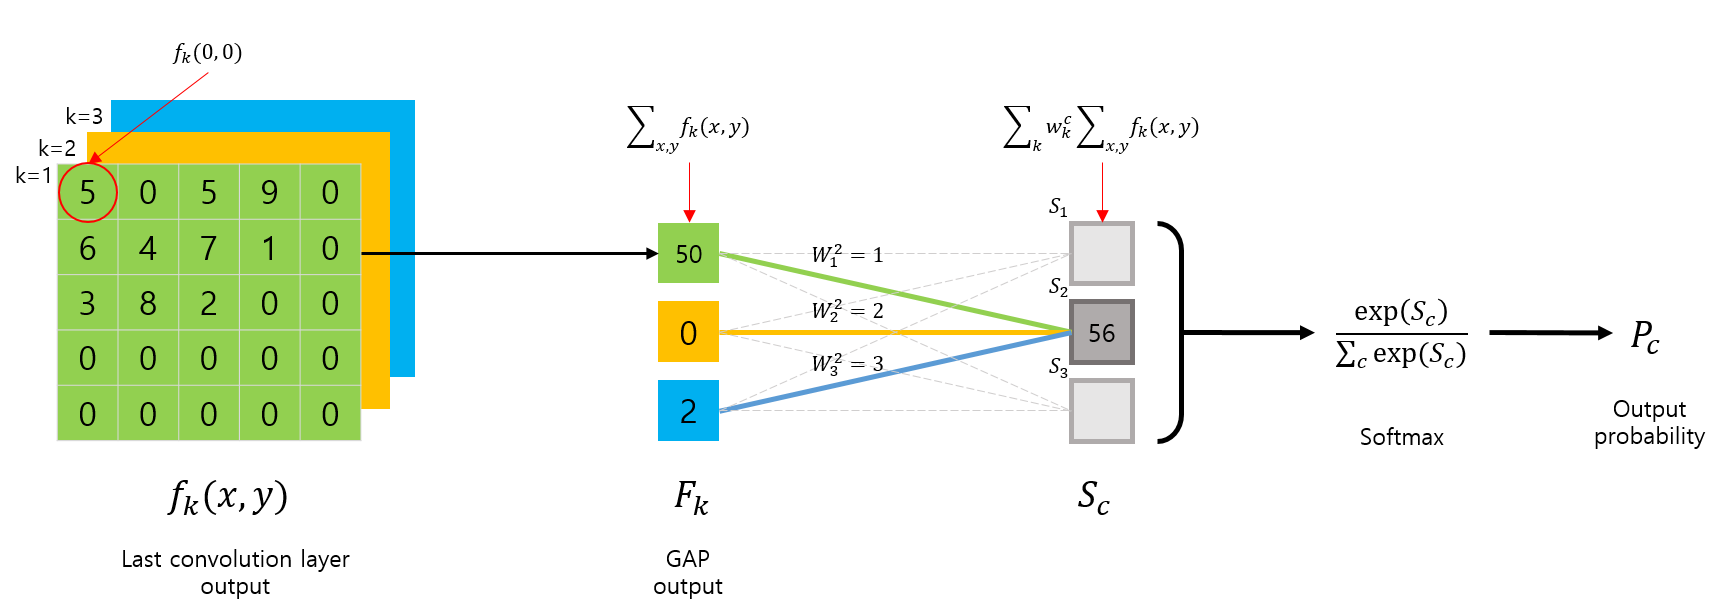
https://you359.github.io/cnn%20visualization/CAM/ 
https://you359.github.io/cnn%20visualization/CAM/ CAM은 원래 이미지보다 그 크기가 훨씬 작을 수밖에 없는데, 이를 upsample 해서 원래 이미지 크기로 만든 다음 이미지 위에 겹쳐보면 모델이 이미지의 어떤 부분에 근거하여 해당 class로 분류했는지 알 수 있다. 아래 그림을 참고하자.

Weakly-supervised Object Localization
논문에서는 CAM을 Weakly-supervised Object Localization으로 활용한다. 유명한 CNN모델인 AlexNet, VGGnet, GoogLeNet에 FC layer를 빼고 결과 나오기 직전에 GAP을 넣어 CAM을 사용할 수 있게 모델을 수정했다. 이 모델을 classification 바탕으로 학습시킨 후 CAM을 뽑아내 상위 20% 값을 segment한 후 가장 큰 덩어리를 커버하는 bounding box를 만들었다. 이렇게 하여 classification 트레이닝과 데이터셋으로 object localization을 할 수 있었다.

CAM을 간단히 구현해봤다.
먼저 데이터셋을 불러온다.
import numpy as np
import cv2
import os, glob

parasitized_dir = glob.glob('./Parasitized/*.png')
uninfected_dir = glob.glob('./Uninfected/*.png')
print(len(parasitized_dir), len(uninfected_dir))
13779 13779 from tqdm import tqdm width = 128 height = 128 image = [] label = [] task1 = tqdm(parasitized_dir) task2 = tqdm(uninfected_dir) for img_path in task1: img = cv2.imread(img_path, 1) img = cv2.resize(img, (width, height), interpolation=cv2.INTER_CUBIC) img = np.transpose(img, (2, 0, 1)) / 255 image.append(img) label.append(0) for img_path in task2: img = cv2.imread(img_path, 1) img = cv2.resize(img, (width, height), interpolation=cv2.INTER_CUBIC) img = np.transpose(img, (2, 0, 1)) / 255 image.append(img) label.append(1) image = np.array(image) label = np.array(label) print(image.shape, label.shape)(27558, 3, 128, 128) (27558,) 데이터를 torch tensor로 변환하고 몇가지 데이터를 시각화 해봤다.
import torch
import torch.nn as nn
import torch.nn.functional as F

from torch.utils.data import TensorDataset
from torch.utils.data import DataLoader

x_train = torch.FloatTensor(image)
y_train = torch.IntTensor(label)

dataset = TensorDataset(x_train, y_train)
train_set, val_set = torch.utils.data.random_split(dataset, [24558, 3000])

train_loader = DataLoader(train_set, batch_size=32, shuffle=True)
val_loader = DataLoader(val_set, batch_size=32, shuffle=True)
import matplotlib.pyplot as plt dataiter = iter(train_loader) images, labels = dataiter.next() images = images.numpy() labels = labels.numpy() fig = plt.figure() rows = 2 cols = 3 for i, image in enumerate(images): ax = fig.add_subplot(rows, cols, i + 1) image = np.transpose(image, (1, 2, 0)) ax.imshow(image) ax.set_xlabel(classes[int(labels[i])]) ax.set_xticks([]), ax.set_yticks([]) i += 1 if i >= rows * cols: break
언뜻 보면 말라리아에 감염된 세포는 붉은 반점이 보인다. 이제 모델을 구성한다.
import torch.nn as nn
import torch.nn.functional as F

class CNN(nn.Module):
    def __init__(self):
        super(CNN, self).__init__()
        self.layer1 = nn.Sequential(
            nn.Conv2d(3, 16, 5),
            nn.ReLU(),
            nn.Conv2d(16, 32, 5),
            nn.ReLU(),
            nn.MaxPool2d(2, 2)
        )
        self.layer2 = nn.Sequential(
            nn.Conv2d(32, 32, 5),
            nn.ReLU(),
            nn.Conv2d(32, 32, 5),
            nn.ReLU(),
            nn.MaxPool2d(2, 2)
        )

        self.layer3 = nn.Sequential(
            nn.Conv2d(32, 32, 5),
            nn.ReLU(),
            nn.Conv2d(32, 2, 5),
            nn.ReLU(),
        )

        self.avg_pool = nn.AvgPool2d(128 // 8)
        self.classifier = nn.Linear(2, 2)


    def forward(self, x):
        x = self.layer1(x)
        x = self.layer2(x)
        features = self.layer3(x)

        flatten = self.avg_pool(features).view(features.size(0), -1)

        output = self.classifier(flatten)

        return output, features

net = CNN()
device = torch.device("cuda:0" if torch.cuda.is_available() else "cpu")
print(device)
net.to(device)
cuda:0
CNN(
(layer1): Sequential(
(0): Conv2d(3, 16, kernel_size=(5, 5), stride=(1, 1))
(1): ReLU()
(2): Conv2d(16, 32, kernel_size=(5, 5), stride=(1, 1))
(3): ReLU()
(4): MaxPool2d(kernel_size=2, stride=2, padding=0, dilation=1, ceil_mode=False)
)
(layer2): Sequential(
(0): Conv2d(32, 32, kernel_size=(5, 5), stride=(1, 1))
(1): ReLU()
(2): Conv2d(32, 32, kernel_size=(5, 5), stride=(1, 1))
(3): ReLU()
(4): MaxPool2d(kernel_size=2, stride=2, padding=0, dilation=1, ceil_mode=False)
)
(layer3): Sequential(
(0): Conv2d(32, 32, kernel_size=(5, 5), stride=(1, 1))
(1): ReLU()
(2): Conv2d(32, 2, kernel_size=(5, 5), stride=(1, 1))
(3): ReLU()
)
(avg_pool): AvgPool2d(kernel_size=16, stride=16, padding=0)
(classifier): Linear(in_features=2, out_features=2, bias=True)
)마지막 레이어에 fully-connected 레이어 대신 average pooling 레이어를 추가했다. 해당 모델은 output과 feature map을 return으로 가진다. 이제 학습을 진행한다.
import torch.optim as optim

criterion = nn.CrossEntropyLoss()

learning_rate = 0.0005
optimizer = torch.optim.Adam(net.parameters(), lr=learning_rate)
train_losses, val_losses, accuracy = [], [], [] epochs = 10 for epoch in range(epochs): running_loss = 0 for i, data in enumerate(train_loader, 0): inputs, labels = data[0].to(device), data[1].to(device) labels = labels.long() optimizer.zero_grad() outputs, features = net(inputs) loss = criterion(outputs, labels) loss.backward() optimizer.step() running_loss += loss.item() else: val_loss = 0 val_accuracy = 0 acc = 0 with torch.no_grad(): for val_image, val_label in val_loader: val_image, val_label = val_image.to(device), val_label.to(device) val_label = val_label.long() val_outputs, features = net(val_image) _, top_class = val_outputs.topk(1, dim=1) pred = top_class.cpu().numpy() batch, _ = pred.shape target = (val_label.cpu().numpy()).reshape(batch, 1) correct = np.sum(pred == target) acc += correct / batch val_loss += criterion(val_outputs, val_label) acc = acc / len(val_loader) train_losses.append(running_loss/len(train_loader)) val_losses.append(val_loss/len(val_loader)) accuracy.append(acc) print("Epoch: {}/{} || ".format(epoch+1, epochs), "Training Loss: {:.5f} || ".format(running_loss/len(train_loader)), "Val Loss: {:.5f} || ".format(val_loss/len(val_loader)), "Val ACC : {:.5f}".format(acc) ) print('Finished Training')Epoch: 1/10 ||Training Loss: 0.28381 ||Val Loss: 0.25757 ||Val ACC : 0.92908
Epoch: 2/10 ||Training Loss: 0.25046 ||Val Loss: 0.28416 ||Val ACC : 0.92453
Epoch: 3/10 ||Training Loss: 0.23566 ||Val Loss: 0.23125 ||Val ACC : 0.93573
Epoch: 4/10 ||Training Loss: 0.22460 ||Val Loss: 0.22160 ||Val ACC : 0.93207
Epoch: 5/10 ||Training Loss: 0.22136 ||Val Loss: 0.23592 ||Val ACC : 0.92021
Epoch: 6/10 ||Training Loss: 0.21485 ||Val Loss: 0.23150 ||Val ACC : 0.93484
Epoch: 7/10 ||Training Loss: 0.21721 ||Val Loss: 0.23722 ||Val ACC : 0.92487
Epoch: 8/10 ||Training Loss: 0.20277 ||Val Loss: 0.20624 ||Val ACC : 0.93661
Epoch: 9/10 ||Training Loss: 0.19694 ||Val Loss: 0.19953 ||Val ACC : 0.93872
Epoch: 10/10 ||Training Loss: 0.18702 ||Val Loss: 0.19493 ||Val ACC : 0.94238
Finished Training대략 94% 정확도에서 중단했다. 학습 결과는 다음과 같다.
dataiter = iter(val_loader)
inputs, labels = dataiter.next()
images = inputs.numpy()
labels = labels.numpy()

outputs, features = net(inputs.to(device))
outputs.cpu().detach().numpy()
_, outputs = outputs.topk(1, dim=1)

fig = plt.figure()
rows = 2
cols = 3

for i, image in enumerate(images):
    ax = fig.add_subplot(rows, cols, i + 1)
    image = np.transpose(image, (1, 2, 0))
    ax.imshow(image)
    ax.set_xlabel(classes[int(labels[i])] + '/' + classes[int(outputs[i])])
    ax.set_xticks([]), ax.set_yticks([])
    i += 1

    if i >= rows * cols:
        break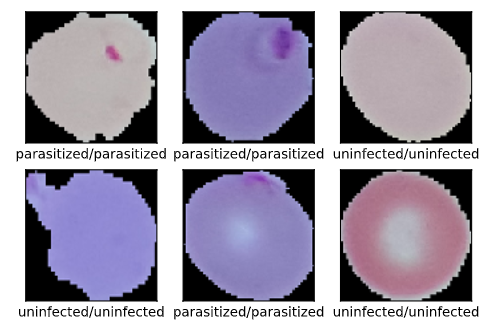
이제 생성된 feature map을 확인해보자.
dataiter = iter(val_loader)
inputs, labels = dataiter.next()
images = inputs.numpy()
labels = labels.numpy()

outputs, features = net(inputs.to(device))
print(outputs.shape, features.shape)

for _, image in enumerate(features):
    image = image.cpu().detach().numpy()
    for i in range(len(image)):
        act = image[i]
        act = act.squeeze()
        plt.imshow(act)
        plt.show()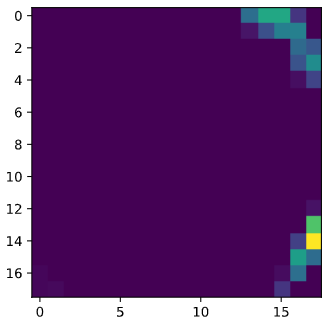


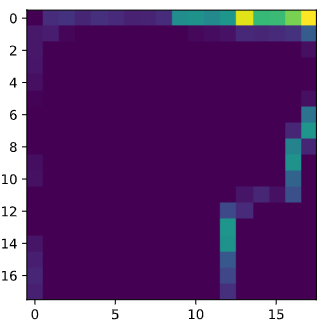

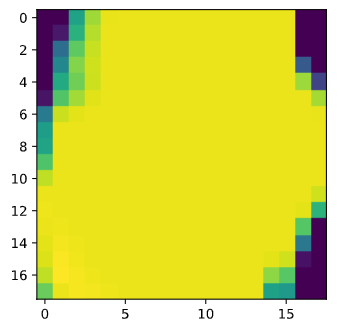

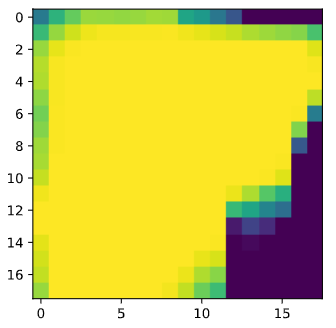
input 1개당 2개의 feature map이 생성된다. (위아래가 한쌍이다.) 이제 논문에 소개된 방식대로 CAM을 계산해본다. 우선 GAP이후의 마지막 레이어에서의 weight는 아래와 같이 확인이 가능하다.
params = list(net.parameters())
# get weight only from the last layer(linear)
weight_softmax = np.squeeze(params[-2].cpu().data.numpy())
print(weight_softmax)
[[ 0.785763 -0.5270212 ]
[-0.12534362 0.22414891]]입력노드 출력노드 모두 2개 이므로 (2, 2)의 행렬이 정상적으로 출력되었다. 이제 class 별로 feature map과 weight를 곱해 더한 결과는 아래와 같다. (CAM의 크기는 resize 되었다.)
import cv2

dataiter = iter(val_loader)
inputs, labels = dataiter.next()
images = inputs.numpy()
labels = labels.numpy()

outputs, features = net(inputs.to(device))

for c, image in enumerate(features):

    true = images[c]
    label = labels[c]

    if label == 0:
        true = np.transpose(true, (1, 2, 0))

        image = image.cpu().detach().numpy()

        act1 = image[0] * (weight_softmax[0])[0]
        act2 = image[1] * (weight_softmax[0])[1]

        act = act1 + act2

        act = cv2.resize(act, (128, 128), interpolation=cv2.INTER_CUBIC)

        plt.imshow(true, interpolation='none')
        plt.imshow(act, interpolation='none', alpha=0.3)
        plt.show()

    elif label == 1:
        true = np.transpose(true, (1, 2, 0))

        image = image.cpu().detach().numpy()

        act1 = image[0] * (weight_softmax[1])[0]
        act2 = image[1] * (weight_softmax[1])[1]

        act = act1 + act2

        act = cv2.resize(act, (128, 128), interpolation=cv2.INTER_CUBIC)

        plt.imshow(true, interpolation='none')
        plt.imshow(act, interpolation='none', alpha=0.3)
        plt.show()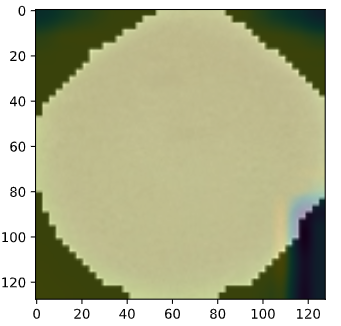

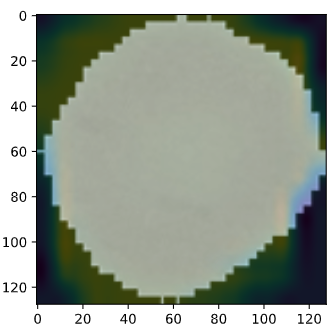


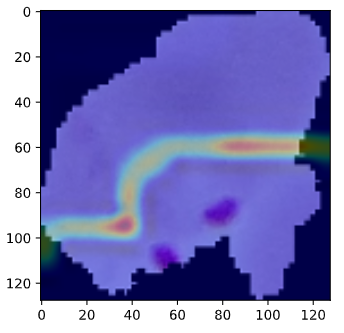
특이하게 세포에 형성된 반점 주변으로 둘러싸듯이 CAM이 형성되었다.
반응형'머신러닝, 딥러닝 공부' 카테고리의 다른 글
Accelerating the Super-Resolution Convolutional Neural Network (0) 2020.02.16 Spatial Transformer Networks (0) 2020.02.08 Grad-CAM: Visual Explanations from Deep Networks via Gradient-based Localization (0) 2020.02.07 Deep Residual Learning for Image Recognition (0) 2020.01.31 VERY DEEP CONVOLUTIONAL NETWORKS FOR LARGE-SCALE IMAGE RECOGNITION (0) 2020.01.30